ads

Showing posts with label jquery. Show all posts

Monday, December 26, 2022

SharePoint custom html form input autocomplete users

SharePoint expose a lot of API. SP REST API reference and samples

The more you know them it's will be easy develop a lot of features

So in our tutorial we will be use   this api "/_api/SP.UI.ApplicationPages.ClientPeoplePickerWebServiceInterface.clientPeoplePickerSearchUser";

to make ajax call and retrieve list of users by param input

1.       first we added a reference to jQuery and jQuery UI library in our page

2.       our html form will be look like this

<div id="my-custom-form">

<input type="text" id="emplyeeName" />

</div>


3.       JS – our script looks like this

<script>

// user picker auto complete rest api

function searchUsers(request, response) {


    var qURL = _spPageContextInfo.siteAbsoluteUrl + "/_api/SP.UI.ApplicationPages.ClientPeoplePickerWebServiceInterface.clientPeoplePickerSearchUser";

    var principalType = this.element[0].getAttribute('principalType');

    $.ajax({

        'url': qURL,

        'method': 'POST',

        'data': JSON.stringify({

            'queryParams': {

                '__metadata': {

                    'type': 'SP.UI.ApplicationPages.ClientPeoplePickerQueryParameters'

                },

                'AllowEmailAddresses': true,

                'AllowMultipleEntities': false,

                'AllUrlZones': false,

                'MaximumEntitySuggestions': 20,

                'PrincipalSource': 15,

                'PrincipalType': 15,

                'QueryString': request.term,

                'Required': false


            }

        }),

        'headers': {

            'accept': 'application/json;odata=verbose',

            'content-type': 'application/json;odata=verbose',

            'X-RequestDigest': $("#__REQUESTDIGEST").val()

        },

        'success': function (data) {

            var d = data;

            var results = JSON.parse(data.d.ClientPeoplePickerSearchUser);

            if (results.length > 0) {

                response($.map(results, function (item) {

                    //  return {label:item.DisplayText,value:item.DisplayText} 

                    return {

                        label: item.DisplayText,

                        value: item.Key.replace("i:0#.w|domain\\", "")

                    }

                }));

            }

        },

        'error': function (err) {

            if (err.responseJSON.error.code = "-2130575252, Microsoft.SharePoint.SPException")

                RefreshRequestDigist();

            else

                alert(JSON.stringify(err));

        }

    });

}

$(document).ready(function(){

    $("#emplyeeName").autocomplete({

        source: searchUsers,

        minLength: 2,

        select: function (event, ui) {

            var label = ui.item.label;

            var value = ui.item.value;

            $("#emplyeeName").val(ui.item.label);


            return false;

        }

    });

});

</script>
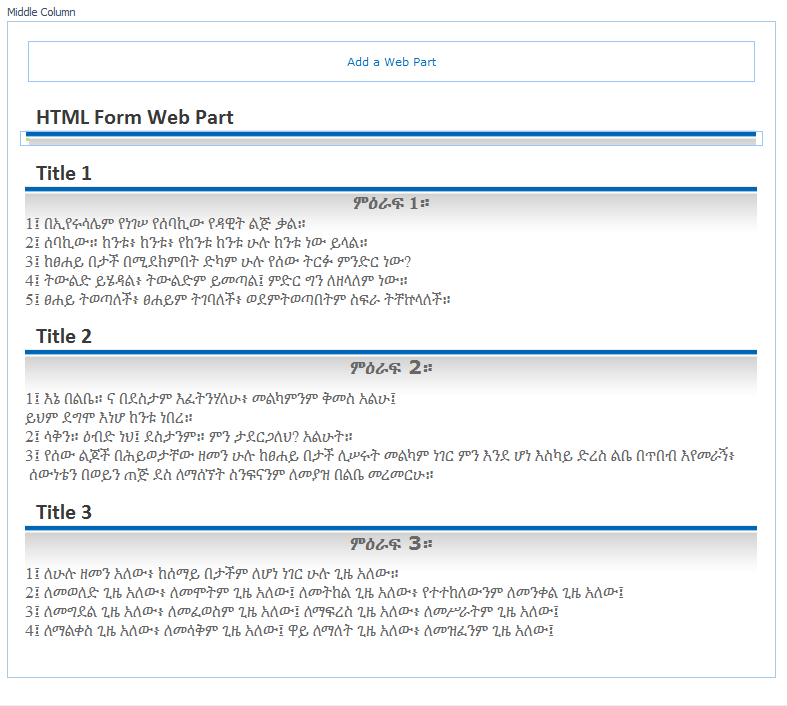
Thursday, March 27, 2014

How to create SharePoint web part tabs in web part zone?

Step 1
Add your web parts into web part zone


Step 2
  1. Add html form Web Part
  2. In web part properties – chrome type set none
  3. Open in edit mode and copy past the code below
Script
var isfirstTime=true;
var myHeader="";

$(document).ready(function(){
var currentUrl=window.location.href;
var patern='PageView';
if(currentUrl.indexOf(patern)!= -1){
  //form is editing now (if form in editing mode don't apply tabs
  }
  else{
$("#CustomWebPartPTabsTable").closest('td[id*="MSOZoneCell_WebPartWP"]').closest('tbody').children('tr').each(function(){

var currentTdID=$(this).children('td').attr('id');
if(isfirstTime==false){

myHeader+='<td><div class="button-link"  ref="'+currentTdID+'" onclick="toggle_visibility('+currentTdID+');"> '+$(this).find('.ms-WPHeader h3').text();+'</div></td>';
//hide ribbon
$(this).find('.ms-WPHeader h3').closest('tr').hide();
//hide web part
$("#"+currentTdID).hide();
}
isfirstTime=false;
});
$("#CustomWebPartPTabsTable").append(myHeader);
//first time
$("#CustomWebPartPTabsTable td div:eq(0)").click();
}


});

function toggle_visibility(item) {
  $("#CustomWebPartPTabsTable").children('td').each(function(){
                if(item.id==$(this).find('div').attr('ref'))
                                {       
                     if($(this).hasClass('buttonSlected'))
                       {
                                                                                                $(this).addClass('buttonSlected');
                                                $(this).find('div').addClass('buttonSlected');

}
                      else
                       {
$("#" + item.id).toggle();
                                                                                                $(this).addClass('buttonSlected');
                                                $(this).find('div').addClass('buttonSlected');

                        }
                                }
                else
                                {
                                                $("#" + $(this).find('div').attr('ref')).hide();
                                                $(this).removeClass('buttonSlected')
                                                $(this).find('div').removeClass('buttonSlected');

                                }
                               
       
  });


}

Css
<style>
.button-link {
    padding: 10px 15px;
    background: white;
    color: black;
                font-size:12px

}
.button-link:hover {
    background: #c2e794;
                border-bottom: solid 1px Green;
    text-decoration: none;
}

.buttonSlected
{
    background: #c2e794 !important;
    border: solid 2px #c2e794 !important;
                color:black !important;
                font-size:16px !important;
    text-decoration: none;
               
}

</style>
Html
<table style=" border-top :solid #c2e794;"><tr id="CustomWebPartPTabsTable" style=" border-top : 1px  #c2e794;"></tr></table>


Result


Do you like this post?
Buy me a cup of coffe to show your appreciation!

Wednesday, March 19, 2014

How to create custom progress bar in SharePoint list column?

Step 1:
  1. Create list with my "progressBarList "
  2. Create column with name Progressbar ,column type number

Step 2:

                Create calculate column with name "CustomProgressBar "
                Set in formula:  ="---"&[Progressbar]


Step 3:
  1. Edit list page
  2. Add form web part to this page
  3. Put the code below in form web part source or download from here
  
<script>
// run on tr with class '.ms-vb2; in '.ms-listviewtable' class
$(".ms-listviewtable tr .ms-vb2").each(function(){

//chack if current td innet text contain custom value like '---'
if($(this).text().indexOf("---")!=-1)
{

// split by uniq value '---'
var temp=$(this).text().split("---");
 
 //temp[1] contain the value
               
                //set background color green if value is grther then 65
                if(temp[1]>65){
                                $(this).html('<div style="color:#ffffff;background-color:#2e983d;width:'+temp[1]+'px; padding-top:3px; text-align: center;"><b>'+parseInt(temp[1])+'%</b></div>')

                                }
                //set background color yellow if value is between 33 until 65 
                if(temp[1]>=33&&temp[1]<=65){
                                $(this).html('<div style="color:#ffffff;background-color:#fecf3c;width:'+temp[1]+'px; padding-top:3px; text-align: center;"><b>'+parseInt(temp[1])+'%</b></div>')

                                }
                //set background color red if value is between 0 until 33  
                if(temp[1]<33&&temp[1]>0){
                                $(this).html('<div style="color:#ffffff;background-color:#ee421b;width:'+temp[1]+'px; padding-top:3px; text-align: center;"><b color="white">'+parseInt(temp[1])+'%</b></div>')

                                }
                                // set 'No Tasks' if is blank
                                if(temp[1]=="")
                                $(this).html('<div>No Tasks</div>')
}
});
</script>


Result:


Do you like this post?>
Buy me a cup of coffe to show your appreciation!

Tuesday, November 5, 2013

Create your first SharePoint 2013 App via Napa


In this article i will show you how to develop SharePoint 2013 App

Steps:

1. Sign up for an Office 365 Developer Site here
2. Go to site content and click add in app
3. Select  Napa App from SharePoint store

3. Create  Developer site collection
4. Select the "Build an app" option


5. Select "App for SharePoint" option
     and provide name for app


6. In this example i will show weather forecast of Ethiopia capital city
(see older post display-current-weather)

Html
in Defualt.aspx append this table into
<asp:Content ContentPlaceHolderID="PlaceHolderMain" runat="server"> tag

 <table border="0" width="100%">
    <tr id="WtitleImage"></tr>
    <tr id="Wc"></tr>
</table>
    <div id="WIcon" />

Css
in App.Css file append classes

#wxWc {
    display: inline-block;
    width: 34px;
    height: 34px;
    margin: 1px 6px 0 8px;
    overflow: hidden;
}

#wxWc {
    display: inline-block;
    width: 34px;
    height: 34px;
    margin: 1px 6px 0 8px;
    overflow: hidden;
}

#WIcon {
    display: inline-block;
    font: 20px/28px Arial,Verdana,sans-serif;
    color: #333;
    vertical-align: top;
    padding-top: 5px;
    margin-left:
}

Java script 
in App.js file append this function
and in document redy function  create a call to function

    function showAddisAbeba()
    {
        var u="c";
    var loc="ETXX0001";
    var query = "SELECT item.condition \
            FROM weather.forecast \
            WHERE location='" + loc + "' AND u='" + u + "'",    url = 'https://query.yahooapis.com/v1/public/yql?q=' + encodeURIComponent(query) + '&format=json';
        $.ajax({
            url: url,
            dataType: 'jsonp', // this automatically disables cache too
            success: function(data) {
                var info = data.query.results.channel.item.condition;
                $('#WIcon').css({
                    backgroundPosition: '-' + (61 * info.code) + 'px 0'
                }).attr({
                    title: info.text
                                });

    // append to table
                            $('#WtitleImage').append('<td>Addis Abeba Ethiopia</br><img src="http://l.yimg.com/a/i/us/we/52/' + info.code + '.gif" width="34" height="34" title="' + info.text + '" /></td>');
                             $('#Wc').append('<td>'+info.temp + '&deg;' +(u.toUpperCase())+'</td>');        }
        });
    }


7.Click Run Project icon


8. Result


9.Under site content option we will see our app


Do you like this post?
Buy me a cup of coffe to show your appreciation!

Thursday, October 24, 2013

Create a horizontal view SharePoint list data


In this article i will show how create a horizontal view from sharepoint list data
using Client Object Model  ,you can see here to ways for retrieving sharepoint list data
1. My share point list 


2. The result


Steps:

1.  HTML

<table border="1" id="MyReport">
  <tr>
    <th>Name</th>
    <th>Jan</th>
    <th>Feb</th>
     <th>Mar</th>
     <th>Apr</th>
     <th>May</th>
     <th>Jun</th>
      <th>Jul</th>
      <th>Aug</th>
      <th>Sep</th>
      <th>Oct</th>
      <th>Nov</th>
      <th>Dec</th>
    </tr>
</table>


2. Java Script 


 <script type="text/javascript">
var Cyclemonth=new Array(12);
Cyclemonth["Jan"]=0;
Cyclemonth["Feb"]=1;
Cyclemonth["Mar"]=2;
Cyclemonth["Apr"]=3;
Cyclemonth["May"]=4;
Cyclemonth["Jun"]=5;
Cyclemonth["Jul"]=6;
Cyclemonth["Aug"]=7;
Cyclemonth["Sep"]=8;
Cyclemonth["Oct"]=9;
Cyclemonth["Nov"]=10;
Cyclemonth["Dec"]=11;


var clientContext = null;
var web = null;
var list;
var camlQuery;
var rows = [];
 var counterNewRecord=0;
ExecuteOrDelayUntilScriptLoaded(drowBarByTitle, "sp.js");

function drowBarByTitle()
{

//retriving from other site
var siteUrl = '/sites/siteName';
//clientContext = new SP.ClientContext(siteUrl);

 //from current sute
clientContext = new SP.ClientContext.get_current();

//get web
web = clientContext.get_web();

//provide relevant list name
list = web.get_lists().getByTitle("MyTestListName");
camlQuery = new SP.CamlQuery();
//set  camel query
var q = '<View><RowLimit>500</RowLimit></View>';
camlQuery.set_viewXml(q);
this.listItems = list.getItems(camlQuery);
//set the culomn name that you want to returen
clientContext.load(listItems, 'Include(Title,Month,Percent)');
clientContext.executeQueryAsync(Function.createDelegate(this, this.onListItemsLoadSuccess),
Function.createDelegate(this, this.onQueryFailed));
}
function onListItemsLoadSuccess(sender, args) {


var  currentTitle;
var  currentPercent;
var  currentMonth;


 var listEnumerator = this.listItems.getEnumerator();
 //iterate though all of the items
 while (listEnumerator.moveNext()) {
     var isNull=0;

     var item = listEnumerator.get_current();
  currentTitle=item.get_item("Title");
  currentPercent=item.get_item('Percent');
  currentMonth=item.get_item('Month');


  var index =CheckTitle(currentTitle);
  //not exsit
   if(index==null)
     {
         
             fillArrayWithZero(currentTitle,Cyclemonth[currentMonth],currentPercent);
            
     }
    
     else
     {
     rows[index].months[Cyclemonth[currentMonth]]=currentPercent;
     }


   }


    AddToTable();  
}
//check if exsite in array
 function CheckTitle(currentTitle)
{

 for(var j=0;j<rows.length;j++)
 { 
      
  if(currentTitle==rows[j].title)
  { 
        return j;
  }
   }
 return null;

}

//creat new row and add data
function fillArrayWithZero(title,month,percent)
{

var row  = {
 title: title,
 months: [0,0,0,0,0,0,0,0,0,0,0,0]
  }
row.months[month]=percent;
counterNewRecord++;
rows.push(row);

}

 //if failed
function onQueryFailed(sender, args) {
 alert('request failed ' + args.get_message() + '\n' + args.get_stackTrace());
}


 //Add To Table
function AddToTable()
{
var strRows="";

  for(var j=0;j<rows.length;j++)
  {
  
   for(var i=0;i<rows[j].months.length;i++)
         {
            strRows+='<td>'+rows[j].months[i]+'</td>';
         }
  
       $("#MyReport").append('<tr><td>'+rows[j].title+'</td>'+strRows+'</tr>');
       strRows="";   
  }
 
 
}

</script>


Tuesday, July 23, 2013

how to create simple countdown timer

1.  via javascript

HTML

<p>My count down</p>
<p id="demo"></p>


Java script

<script>
//declare variables
var hours =0;
var minutes =5;
var seconds=60;
var timer=setInterval(function(){myCounter()},1000);
function myCounter()
{
     seconds--;
     if(seconds==0)
        {
          minutes=minutes-1;
          seconds=60;
        }
     document.getElementById("demo").innerHTML=minutes +":"+seconds;
         if(minutes==0)
             {
               clearTimeout(timer);
               document.getElementById("demo").innerHTML="Time's Up!";
             }
}
</script>


demo timer


2.  via Jquery with progress bar

*add jquery reference

<link rel="stylesheet" href="http://code.jquery.com/ui/1.10.3/themes/smoothness/jquery-ui.css" />
<script src="http://code.jquery.com/jquery-1.9.1.js"></script>
<script src="http://code.jquery.com/ui/1.10.3/jquery-ui.js"></script>


<script>
var hours =0;
var minutes =5;
var seconds=60;
var myprogressbar=100;

var timer=setInterval(function(){myCounter()},1000);
function myCounter()
{
     seconds--;
     if(seconds==0)
        {
          minutes=minutes-1;
          seconds=60;
        }
     $("#demo").text(minutes +":"+seconds);
     myprogressbar-=100/(minutes *60+seconds);

     $( "#progressbar" ).progressbar({
       value: myprogressbar
        });

         if(minutes==0)
             {
               clearTimeout(timer);
               $("demo").val("Time's Up!");
             }
}
</script>

HTML

<div id="progressbar"></div>
<p>My count down</p>
<p id="demo"></p>
 

you like the post buy me a coffee.